Monday, November 28, 2011

Tutorial: baby dress

It's one of those days when Caitlin naps thrice in a day that I get to have some mommy time. So for today, I sewed another dress for her. Mommy time is still a bit about her at times.


The idea for this dress came from Mommy Raquel who showed me a link on Facebook selling clothes for baby girls.
Baby dress by CutieTots Shop

Inspired again, I immediately went shopping for textile at Fabric Warehouse in Libis, Quezon City.
These are my cool finds. I love the nautical-inspired fabric. I am eager to create a matching mommy and baby outfit with it. Watch out for this page soon.
It took me six hours to piece this dress together, from drawing the pattern to taking the final picture and changing soiled nappy in between. The sewing time usually shortens once you get the hang of it.
Anyway, eager beaver as I could be sometimes, I opted to work with what I have just so I can get started. As you'll see, I wasn't able to use matching threads. But it still worked for me.
For the free baby dress pattern, Small Dream Factory offers a simple design for four to six-month olds. Check the quick tutorial here.
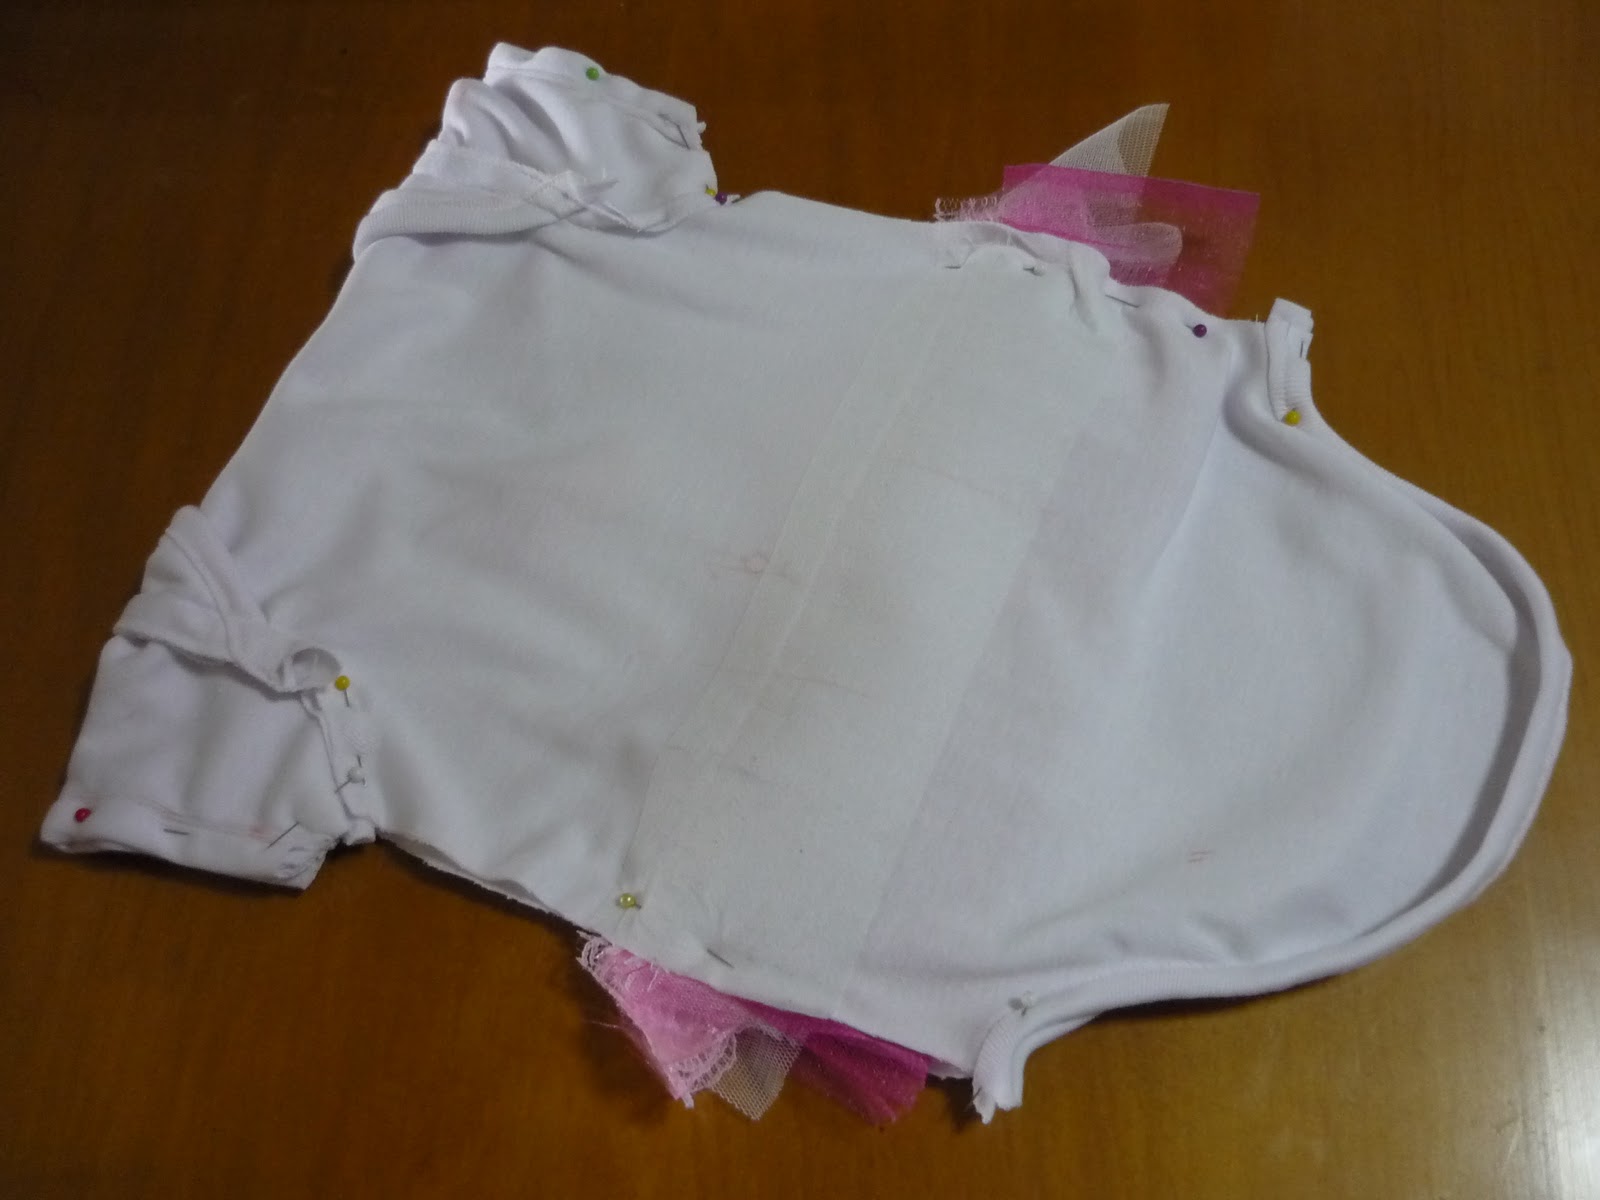
Again, I worked with what I have so I modified the front part that calls for a zipper and instead added about two more inches at the shoulder area of the back piece to make room for snap-on buttons.
Plus, I embellished with frayed rosettes and modified (for lack of a better sewing term) the ends.
In case you have hours to spare, try this out, too.

What you will need:

- less than 1/2 yard of fabric for the dress. I used non-stretch Cotton Voile.
- about 1/4 fabric for the lining. I used Swiss Voil in cream.
- sewing accessories such as scissors, pins, threads, and markers.
- glue gun and stick for the frayed rosettes.
Print the free baby dress pattern. I put one centimeter seam allowance all over the pattern because it is not included here. For Caitlin's current size, however, it was not necessary after all.
Since I wanted a two-toned baby dress, I marked the lower portion where I will put the other fabric.
My pattern pieces with cream lining. The strips on the left side will serve as armhole binding.
Pin the blue fabric on the yellow one and sew. Do the same for your back piece.
So it'll look like this.

You may choose to add binding as seen on the armholes or neatly fold the fabric and sew as seen on the neck.

 It'll look like this. Finish sewing the top of shoulder.

Make a bias tape and cut into strips of 2" long. Click here for the tutorial on how to make a bias tape.

Fold the bias tape pieces in half, pin them in between your lining and front fabric, and sew.

Look from the inside (wrong side) before sewing.

Pin both sides and sew.

Make two frayed rosettes. Check out the free frayed rosettes tutorial here.

Place them here and hand sew in place.

And there you have it. You may either sew in buttons or put snap-on buttons on the shoulder. This pattern may be adjusted to fit your growing baby.
See if it fits her and make the necessary adjustments. In my case, I had to shorten the dress a bit.

Oopppsss. Too short this time. I need to adjust it again then have snap-on buttons added at the Kamuning Market.

Up next, I'll be making a matching diaper cover. Watch out for it. =)

- Mommy Smiley


Sunday, November 27, 2011

Decorating for the little one

With Christmas less than a month to go, it's time to deck the halls with boughs of holly.


Although Christmas came and went last year without so much as a sock, wreath, lights, or parol in our household, this year is different with Caitlin around. We decided to decorate for her.

So for our first Christmas tree and holiday home decors, we trooped to Unique Novelties & Toys Corporation.

Hidden on a nondescript street in San Francisco Del Monte in Quezon City is a warehouse full of Christmas decors, house wares, kitchen supplies, souvenirs, and other gifts and novelty items. It also houses lots of costumes and party accessories for Halloween, Christmas, Easter, and even bridal showers (or whenever you may need neon bright party wigs for).

Most of the items sold here are what you will usually find in malls, but at a discounted price. Items are sold per piece, and go cheaper if you buy a set of three or six.

It also sells many kinds of toys for children. But please take note that children under 10 years old are not allowed in the showroom. Bags are also not allowed up the second floor where most of the items are being sold. You'll be asked to deposit them inside a locker instead.

It opens on weekdays and Saturdays from 9:00 am to 5:30 pm., but from now until December 18, Unique Novelties will open on Sundays.

Unique Novelties & Toys Corporation is located on 15 Zorra St., Brgy. Paltok, Quezon City. Tel no. 02 3735001; 02 3717976.
Decors for the tree. By the way, taking pictures are not allowed inside the showroom.

We'll ask her to help out if she could.

Our first Christmas tree.

Thursday, November 24, 2011

Home shopping for nursing wear

Forget lining up in dressing rooms. Enjoy shopping at your own time, pace, and place. Mommy Matters takes home shopping seriously.

All you need to do is call up Mommy Matters (02 2153304/0927 4281012) and request for your size/s to be delivered to your home address. Unsure of my size, I asked for nursing wear clothes in the small and extra small range. A suitcase and a big carry-all canvas bag arrived two days later, overwhelming our dining room table with clothes.

The trunkload of clothes inundated our dining room table.

It’s impossible, at least for me, to pick out just one or two items from its collection. You’ll probably end up with a few which makes the Php2,500 minimum purchase to waive the Php250 delivery fee sound reasonable. When you are done shopping, just call them up and ask for a pick-up.
These are a few of my favorites.

With my inaanak at Shangri-la Mall.

With my anak in Lucena.

Breastfeeding at SM Megamall before I found out that it has a Breastfeeding Station.

A more casual tee.

Unfortunately, although I hardly use the dresses that I bought, I noticed some holes in them after a few washing so I had to do some sewing. It’ll just get bigger if I don’t.
That said, I am happy with my purchases and I enjoyed the home service. 
- Mommy Smiley


Tuesday, November 22, 2011

My Mommy Mundo experience

Last Saturday, the whole family went to Mommy Mundo Bazaar to support Medela and to finally get my Mommy Mundo privilege card. I'm also on the look-out for new finds for my son such as cute onesies or rompers. (I can’t sew. I am not as talented as mommy Smiley. Hehe). I was also hopeful that I could find some white rubber shoes for him, but had no luck.

Overall, it was still successful because of the tons of gifts mommy received. See?


Finally, my Mommy Mundo privilege card.

I'm loving the Mommy Mundo planner.

Look inside the pages.

Useful, right?
I say a must-have for mommies.


Coupons.

Free Cycles detergent from Cycles booth and some Mustela and Cordlife giveaways. I am liking the rattle. Plus, a very informative issue of Smart Parenting magazine.
Eager to try these. Thanks for the sample!

Brochure from Medela. I am a user of Medela, Tommee Tippee, and Avent. Reviews on them soon.

I was happy to see these two. I am already preparing for Sam's 1st birthday!
These finds are also interesting.

Sadly, I didn't get to bump into mommy Smiley and Caitlin. But there'll be a next time, right, Mommy Mundo?

Hugs and kisses,
Mommy Raquel

Yummy recipe: Tuna Panini with cheese

What's for breakfast? Tuna Panini with cheese.


My husband has been complaining that I sleep too much. So for the past couple of days, I started waking up early… early enough to make hubby his breakfast: yummy Tuna Panini with cheese.

I made the tuna spread the night before and stored it in the refrigerator in time for breakfast the next day. It’s simple and very easy to do. Here’s the recipe.


Ingredients:

Kraft Miracle Whip (my husband’s preference)

2 cans (180 g) Century Tuna Flakes in Brine (drain the water)

2 medium sized onions (chopped)

Salt and pepper to taste

Kraft cheese singles

White bread


Directions:

Mix all the ingredients together except the cheese and white bread. Others add more mayonnaise, some like it with more pepper. I want mine with more tuna.

To arrange the sandwich, set the Panini grill to medium to high heat (depending on the time you have to prepare this). I used to own an Imarflex Panini grill. It’s so easy to handle. All you have to do is plug it in and wait for the green light then you are all set. Now, however, I am using a more sophisticated gadget, the Cuisinart GR-4N 5-in-1 Griddler (special thanks to John and Cathy Villamiel for the best wedding gift ever). As it is, this can be used as a Panini grill press or a Griddler for grilling Angus beef burgers.

Get two thick slices of white bread. Smother one side of the bread with tuna spread, add a slice of Kraft cheese singles and top with the other piece of bread.

When the grill is ready, place your assembled sandwich then "press" Panini until you achieve your perfect browning.

For your husband or child’s baon, wrap the sandwich in foil and slip it inside a zip lock bag such as Glad. Wrapping the sandwich in foil keeps it warmer longer.

Happy eating! 

Cuisinart GR-4N 5-in-1 Griddler

Tuna Panini.

My soon to be organized kitchen counter. Sorry, I am in a hurry (excuses!).

Hugs and kisses,
Mommy Raquel

Mommy Mundo Bazaar 2011

Caitlin took home a new toy at the Mommy Mundo Bazaar 2011 held at the Rockwell Tent last weekend.

It was our first time to attend an event organized by Mommy Mundo, and we had a wonderful experience.

It was surprising inspiring to see many mommies turned entrepreneurs.

When we bought Caitlin her white bunny stuffed toy, she instantly grabbed it and bit its poor helpless ears. Yes, such is the fate of the bunny said the pregnant mommy seller who confessed that she was inspired to make it from her experience with her daughter who enjoyed biting almost anything. What's great about it, she said, is that it has texture. But what I liked best is that we can easily clean it (either by hand or machine wash) so we won't have to call it "stinky" for long.

I also went around looking for breastfeeding paraphernalia from breast milk storage supplies to a breastfeeding bracelet but found none. Unless I missed it.

What caught my attention were the baby keepsakes such as the photo shoot package of Life by Image Nation and learning schools such as Musikgarten.

I hardly looked at the cute baby onesies and dresses because my crafty side kept on nudging me away whispering that I could make one for Caitlin instead. Besides, she still has a lot of those. I did, however, took home a lot of ideas and inspiration for my next sewing and craft projects for my baby. Such was the experience that makes me look forward to the next Mommy Mundo Bazaar!


The Mommy Mundo Bazaar was held at the Rockwell Tent last Nov. 19-20, 2011.
It has a Mommy Lounge for breastfeeding moms like me.

 The venue was packed.

Caitlin and her new toy.
 Happy mommy and baby.
- Mommy Smiley


Friday, November 18, 2011

Medela Moms is giving away free breastfeeding guide


We, at Everyday Mommy Diary, support breastfeeding, and we would like to share this information with you: Medela Moms Inc. is giving away free breastfeeding guide!

Maricel Cua of Medela Moms Inc. is inviting pregnant and/or breastfeeding moms to drop by its booth at the Mommy Mundo Bazaar tomorrow until Sunday, Nov. 19-20, from 10:00 am to 8:00 pm at the Rockwell Tent. Register and get a free breastfeeding guide. See you there!

Want to find out who else will be joining the bazaar, check this out!

-   Mommy Raquel and Mommy Smiley

Thursday, November 17, 2011

Tutorial: baby onesie with tutu

Babyland at Eastwood Mall sells a cute white onesie with sewed in pink tutu for Php490 which I found irresistibly cute. But while looking at it, I thought what could be more exciting than sewing one myself for Caitlin?!

Now, the key here is to find a really good material made of breathable fabric such as cotton so she can actually wear this without irritating her skin.

I went all the way to Tutuban to buy a good cotton (CVC), one in white (Php280/kilo) and another in baby pink (Php300/kilo). (Yes, that's in kilo instead of yard. That's the minimum sale per fabric = one kilo. For the CVC cotton that's roughly 2.5 yards. That's a lot for one onesie.). For the tutu, I got some tulle and lace from Carolina’s Lace Shoppe at SM Megamall.
Omi Creates offers a free sleeveless onesie pattern for home use. But since I want mine to have sleeves, I used Caitlin’s old onesie as a guide.
Once you have the patterns printed out, let’s begin.

Free tutorial and onesie pattern from Omi Creates.

Cut your pattern pieces.


I prefer to sew the bindings first.

Join them together on the dots marked in your patterns.
So it’ll look like this on the outside.
If you want it with sleeves, insert the sleeves here.
Pin them together and sew.
Cut your tulle and pin on fabric as such.
Sew.
Do your second layer and sew.
Add some lace then sew.

Hearts as added embellishment.

Stitch this by hand while making sure that not a strand of thread is showing on the outside.

 Do the same on the other side.

Press some fuse on the inside.

So it will look polished on the inside.

Pin and sew the two pieces together.

And there you have it. But you are not done yet. This needs some snap on buttons which requires a special equipment. You can have it done at Kamuning Market for Php10 apiece.

See how clean it is inside.

Go try it on your baby.

View from behind.

I forgot how curious she is and how wild she is with colors. I bet she'll try to put the tulle in her mouth if and when she can.

Happy sewing!

- Mommy Smiley