Showing posts with label arts and crafts. Show all posts

Wednesday, July 25, 2012

Upscaling used containers

Upscaling or upgrading used containers that you have at home is not only a fun activity that you can share with the kids, but it is also an opportunity to teach them how to contribute to the environment by recycling and avoiding unnecessary waste.


Those are two great reasons to get into upscaling in the first place even though those weren't my primary reasons for deciding to decorate a used plastic container that has been keeping Caitlin's tea set for months.


My initial thought was only to cover up the container to make it more appealing so I got a purple cloth, ribbon, garter, matching thread and brought out my machine for an hour of sewing. And in another container, I simply put paper stickers and a few scrapbooking decors and glued them on the box.


The results were better looking boxes for Caitlin's toys.


Earlier, I also put ribbons around a used sardines bottle and converted it into a hair clip container.


With more toys and other children's stuff piling up in the house, it's a challenge to keep everything tidy everyday and containers - big and small - always come in handy to keep some toy parts together or just hide away all the mess.


I am sure there are a lot of used stuff lying around in your house that - with a little imagination - could turn out to be something else more beautiful.


Happy upscaling!


- Mommy Smiley


A used cookie container.

Putting cover on a used container.
Decorating a used box with stickers and craft materials.
Stacking them.
Making use of an old cookie container.
A box to put away some of her toys.


Hair clip organizer.
Another view.

Tuesday, June 26, 2012

Sew, mommy, sew

Sewing has become a therapy. Here's a recent project to add color to our living room.


- Mommy Smiley


Our living room.

The then (left) and now (right).
The finished products.

Friday, April 20, 2012

Tutorial: party pompoms

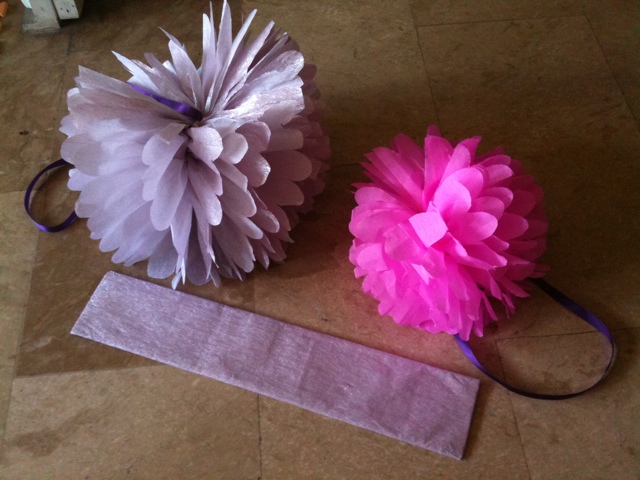
 Decorative party pompoms.

Decorative pompoms are an easy and fun way to glam up any themed party, and I just learned how to make them in time for Caitlin's birthday bash, thanks to my sister-in-law who's a natural DIY queen when it comes to event styling.


What you'll need:


Crepe paper in any color
Thin wire or floral stem (#26 or #30)
Matching strings or satin ribbons

 Prepare your materials. I bought all these at National Bookstore.

Directions:

 
Decide on how big or small you want your pompoms to be then cut your paper into rectangle pieces, the width will determine its diameter when opened.


For medium pompoms, making use of a full crepe paper, that's about 12 pieces of 10" x 12". You'll make a smaller one when you use 10 pieces of the same size.


For twice that size, cut 12 pieces of 11.7" x 15.5". The excess, which measures 4" x 4.3", may still be made into tiny pompoms.


Large and medium pompoms.

Place the rectangle pieces together and trim two opposite ends to make scallop edges. Although you can do it freestyle, it's best to work with a pattern, especially if you are making a lot of pompoms.

 Scallop edge.

Then, starting from one straight edge going to the other side, make a folded fan out of it, roughly half an inch in size.


Secure with a thin wire in the middle and place a ribbon.


Starting from one side, gently peel the crepe paper one by one as if opening a banana. Finish it off on the other side.


There you go.


You can also use Japanese paper, but I find crepe papers easier to handle because they are thicker so they don't tear easily. Crepe papers, the basic ones, are also less expensive than Japanese papers.

Happy crafting!

- Mommy Smiley


Monday, December 5, 2011

Tutorial: DIY invitations

When inspiration hits you, grab it.

I saw a Christening invitation shaped as a onesie on Facebook once. But instead of asking where she got it, I googled for an invitation pattern so I can make it myself in time for Caitlin's baptism. With the advent of the internet, you can find almost anything online. True enough, I saw what I was looking for here.

Once you have the pattern printed out, just buy the materials at your local bookstore and leave everything to your imagination.
Pattern pieces.

Some scrapbooking materials I had laying in the house.

DIY invitations with my handwriting for Caitlin's baptism.

Mix and match buttons and ribbons.


For Caitlin's first birthday party, I plan to do more DIY invitations. I am still undecided, however, as to the party's motif so let me leave that for next year.

- Mommy Smiley

Scrapbooking

First-time parents are usually trigger-happy. Every new clothes, every step, every smile, and every tooth brings joy and an occasion to click away. Milestone or not, there will always be an excuse to take your baby’s picture. And before you know it, you’ll be filled with thousands of digital prints waiting to be printed and framed. But not all photographs merit a space up your wall. Some are better kept in an album or your cell phone.
Unfortunately, photo albums and baby books limit your creativity as they only allot minimum space for you to express yourself and your baby’s activity while a compilation of photos on your cell phone can easily be deleted. A better way to capture those precious moments, say a thing or two about them, let your creativity shine, and make them last is through scrapbooking.

Your imagination’s your limit with scrapbooking. You can use keepsakes from your baby’s stuff or buy baby-inspired decors at your local bookstore.

Here’s what I have been trying to put together for the past few months. It’s still under construction though.
Every month, I try to put in a picture that will capture her best. For example, Caitlin can hold her head up at one month old, laugh at two months, bring her hands together at three, and comfortably rest on her tummy at four. On her fifth month, I can't decide what to put in next. Is it her picture reaching for her toes and licking it, crawling on all fours, or her two lower teeth?
On the day that she was born.
A few pages are dedicated for the stuff that I sewed her.
National Bookstore sells affordable scrapbooking materials.

A scrapbooking album also makes for a perfect gift for your child when she can already appreciate it.

Plus, when your little one gets old enough to handle scissors and glue, scrapbooking can be a beautiful bonding time between mommy and baby.

Start early. Compile your pictures today.
- Mommy Smiley

The art of wrapping gifts

I’m so ingit with Mommy Smiley's Christmas tree… to think that Unique Novelties & Toys Corporation is just two blocks away from my mom's house. =( Unfortunately, we haven't started with our Christmas tree yet because for the past two months, we have been squatting with the in-laws. The on-going renovation in our building is such a Grinch in disguise. Boooo!!! But to psych myself into the Christmas spirit, I wrap gifts. I always look forward to wrapping gifts. I love it so much that I have become the designated gift wrapping girl in our whole family. I'm so matiaga in wrapping gifts even for my sisters’ inaanaks. I usually get mad at my sisters if they don't send the gifts to be wrapped early. I also get furious if they don't send me coordinated wrappers and ribbons. Yes, I take gift wrapping seriously! Hahaha!

This year, our motif was Damask. I got gift wrappers from BellaCarta and ordered personalized Christmas gift tags from Adworks (I love Mye Cruz of Adworks. She has a very fine taste) with the same damask pattern in red. For ribbons, I've decided to go green. This year, we’re using recycled gift ribbons.

Ribbons from our wedding gifts (2009).
From left: flat ribbon, loose ribbons, and damask gift wrapper.

Some gift wrapping tips:


1.       Iron loose ribbons. Since these are fabric ribbons, you can iron them out to look brand new. =) 

2.       Separate ribbons following these categories:

· Width or thickness. Make it seamless.

· Color or shade. You don't want to use two different shades of silver, for example.

· Length. See below.

3. Use the shorter ribbons to cover the width. Do not cut the ends yet.


4. Use the longer ribbons to cover the length part. Intertwine the first knot with the second knot. This will create a seamless illusion of a full ribbon.

5. Get the bow that you wish to use and look for its fold. Put the bow on top of the knot and use the shorter ribbon to tie it in place. Do a double knot then cut it shorter than the loops.

Since we're using used and flat bows, invert them to give them life.

Handwritten Christmas message makes any gift extra special. =)

Writing this post just made me realize how creative I could get. Hahaha! I just wish I can learn how to sew like mommy Smiley. Happy wrapping! =)

Hugs and kisses,
Mommy Raquel