Thursday, May 10, 2012

Caitlin turns 1, the birthday party

The happy birthday girl.
The pictures are in, and they tell the story of how Caitlin's first birthday party went - from the do-it-yourself (DIY) decorative pompoms, home-made cake to the teacher-led games for the little ones, boy, were we exhausted!

The Gymboree party did not start until 4:30 pm on April 29, but I was already making the pompoms, souvenirs and game prizes for the kids weeks ahead at home. A day earlier, I spent it baking the cake while Caitlin was away with her grandparents.

On the party day itself, I woke up early to decorate Caitlin's cake with fondant so I can already relax.

Meanwhile, Jay was the busy bee preparing spaghetti and then packing them in carton food boxes.

It was a DIY birthday party of sorts. We weren't driven by costs, but by sheer desire to provide Caitlin something we made ourselves. It was labor of love the way we understand it.

But as her party drew near, Jay and I knew that we would not do it again. The preparation did not stop from the planning, sourcing vendors and caterers, and coordinating with them on the day of the party because we were also part of the catering and event styling.


DIY party pompoms.

But it all worked out. The one-hour lead time that we've allotted was more than enough for us to put everything in place - many thanks to my brother Dino who pinned all the pompoms to the ceiling, a task I thought was for me to do at three months pregnant! Jay's eldest brother Michael also helped with the hauling of our stuff from home to the mall. And who would deny the friendly and courteous guard at the mall as well as the staff of Gymboree? They were all very helpful to us.

So when every decor, cocktail, cake, and gift tables were set by 4:00 pm, we started relaxing.

But as the guests began arriving one by one, the birthday girl who was coming with her grandparents was still nowhere in sight!

It was past 5:00 pm when we saw her and because there were already a lot of people, it did not occur to me to nurse her first before we begin with the teacher-led activities. So by the time we were on the play floor, she was not as active or smiley as she usually is at home. I think a lot of factors played, too, from the many new faces, foreign environment to the lack of sleep and snack.


Playing on her own this time.
Her mood lightened after dinner as she was playing with our helper. Finally, she was all smiles and our photographer Lianne Bacorro captured it. What any parent would want for his or her child is for him or her to be happy. So the birthday party that we planned ideally for a one-year-old came to be - a happy child discovering and practicing her motor skills in a safe environment.


As for everything else, Jay and I couldn't be happier. The guests were inquiring about our caterer for the food and even the styling of the place that we had to tell them several times how we made a lot of them ourselves. Also, Abi Ong of Forks and Beans supplied a wonderful treat of chicken and salmon sandwiches with potato salad on the side while my mom provided the fried chicken which we packed together with the pasta.


Although my co-blogger Raquel Chua could not make it because Sam was sick, Daddy Jon came over with her freshly-baked red velvet cupcakes with cream cheese frosting. They were a hit, and so was my cake which made all my hard labor pay off.


L-R: Raquel's red velvet cupcakes and my home-made lemon cake with fondant.


It was a day to remember, and another wonderful story to tell Caitlin of how we spent her first birthday when she is old enough to ask for stories. Despite agonizing over how her party will turn out to be with all our hands-on participation, we could not imagine having it any other way.

But please don't ask me yet whether we'll do it again for baby number two. Planning a child's first birthday is not as easy as it seems.

For now, let me continue to savor the milestone that Caitlin has achieved and how we are blessed to have celebrated it in the company of close family and friends.


- Mommy Smiley

PS: All photos posted here were taken by Lianne Bacorro.


DIY souvenirs for the kids. The boxes were filled with chocolates.


Abi Ong's sandwiches and salad.


Gymboree's table setting for the kids.


Gymboree mascot.


With mommy and daddy at the play floor.


Playing with daddy.


Matt and colors.


Caitlin on a toy horse.
Siblings Pillar and Tommy at play.


Caitlin wondering what's happening.


We are happy as can be!


Jump!


Bubbles everywhere.


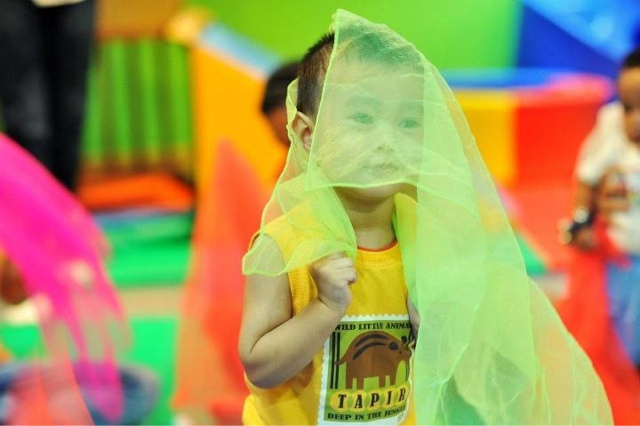
The famous Gymboree parachute.
Caitlin turns 1!
The birthday girl.


The older kids at play.
More arts play.


Older kids' art works.
What's important is that she had fun on her first birthday party.

Yummy recipe: taco salad

There is something therapeutic about cooking - even while you are only preparing the ingredients. I guess it's the break from your usual routine that makes cooking fresh again. I did not use to cook. I only picked it up when I got married - same with my other newly-acquired domestic skills such as baking and sewing. So when I finally put Caitlin to sleep, I detached from my phone and stayed away from my laptop so I can prepare the dressing for the Yummy Taco Salad that we are having for lunch.

I modified the recipe I found from http://www.yummy.ph/. I never used cilantro leaves and sour cream. And I also do not follow the recipe to the letter, but according to taste. Today, however, I will be using soft tortillas instead of nachos which we usually have. If that does not work, we can always buy tortilla chips at the nearest convenience store.

The Yummy Taco Salad is best served during dinnertime with beer, but it is up to you really.

Click on this link to view the recipe submitted by Jun Jun de Guzman or see my version below.

For the dressing:
Combine balsamic vinegar, olive oil, tomato sauce, sugar, chopped onion, and a dash of hot sauce to taste.

For the beef mixture:
Saute chopped garlic and onion in oil. Add in the ground beef. Season with cumin powder, salt, and pepper to taste.

You'll also need to chop lettuce and tomatoes in bite size pieces.

To assemble the salad, lay your nachos, soft tortillas, or tortilla chips on a platter. Spread lettuce and tomatoes on top. Add in your beef mixture and dressing before topping it off with grated cheddar cheese.

Enjoy!

- Mommy Smiley
Trying the recipe with tortilla chips. It's still best with nachos.

If you want it heavy and very filling, try it with soft tortillas.

Sunday, April 29, 2012

Caitlin turns 1, a birthday party preview

All boxed up and ready to go. After a day's work, I finally finished the birthday girl's cake!


Caitlin's first birthday party will push through today. We had to move it from last week to allow her to heal from baby measles (roseola infantum). She's now well and we pray that she'll enjoy her Gymboree party this afternoon.


- Mommy Smiley

Saturday, April 28, 2012

Co-sleeping

Sleeping and waking up next to a baby have their own pros and cons, but mostly pros - the cons just need adjusting to.

If you are a breastfeeding mom, co-sleeping is more convenient than having your baby sleep in his or her own crib or in another room. You don't need to stand up, just roll over to where your baby is, lift up your shirt, and let your baby do his or her thing while you continue on with your sleep.

Also, you can easily soothe your baby when he or she suddenly wakes up in the middle of the night crying. Sometimes, babies just need the comfort of your embrace, gentle pats on their buns, or a few strokes on their backs to get back to sleep. Co-sleeping allowed us to be there for Caitlin as quickly as possible everytime she achieves a milestone such as teething or sitting up and she gets irritated, uncomfortable, and couldn't rest on her own.

Co-sleeping also helped my husband Jay make up for the time he was away by snuggling with Caitlin at night.

But co-sleeping is not an easy thing to do the first time. The thought of having a baby near and the possibility of crushing him or her while you sleep soundly are enough for some parents to decide against sleeping with their babies on the bed with them. You also have to adjust to a smaller space and be conscious of the movements (and sounds) you make so as not to disturb the baby in his or her sleep.

Meanwhile, those who have fairly adjusted to a sleeping baby by their side are rewarded. They could wake up in the middle of the night with the soft, gentle touch or caress of their sleeping baby on their arm, neck, or face. They could wake up in the middle of the night with a still sleeping baby slowly crawling on their tummy or in the crook of their arm and finding his or her position there.

And when the morning comes, they wake up to the sight of a beautiful and peaceful-looking baby. When you stay long enough for your baby to wake up, you are greeted with the most wonderful smell in the world. A baby's natural scent is an aphrodisiac that easily captures the hearts of his or her parents.

It's no wonder why a "baby's breath" fragrance and skin care market grew.

At times, when your baby wakes up ahead of you, you'll be surprised at the many ways that he or she makes to awaken you too such as stroking your hair, patting you, hugging you, or even leaning against you and dancing.

When Caitlin was a newborn, we had her on a bassinet placed on our bed. It was a difficult time because the bassinet took up space and created a divide between Jay and I. When Caitlin grew out of the bassinet, we placed pillows between us to shelter her from our movements and create some sort of safe zone for her. Eventually, we put her on her crib while Jay confessed to having separation anxieties. Later on, Caitlin's back on our bed again. Her choice this time. But since she's bigger, she's no longer as fragile and we can move her around to make space for us. When she started moving a lot, we no longer put a blanket around her. She doesn't like it, and there's also the danger of suffocation. When it's cold, we put her on pajamas, but she's fine even without them.

Also, to co-sleep with your baby and still be comfortable, try getting a bigger bed.


- Mommy Smiley
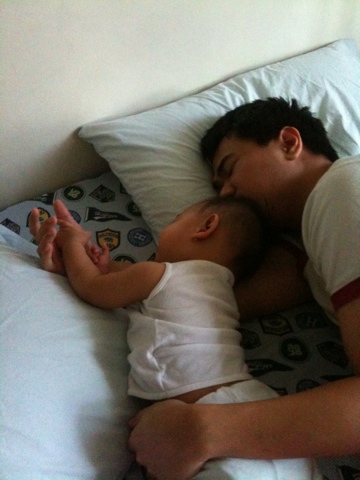
Waking up daddy.


Sleeping on her crib.


Sleeping on a bassinet.


Who wouldn't love waking up next to that?

Saturday, April 21, 2012

Sick baby

My sick child only wants to nurse, cuddle, and be carried. It's been four days and we badly miss her Miss Universe wave, her pa-cute smile, her many tricks, and even her sometimes unmanageable ways during diaper change. Get well soon, anak.


- Mommy Smiley

Friday, April 20, 2012

Breastfeeding: one year on

Breastfeeding: day 1.

When asked about the first word that came to mind about breastfeeding, I answered "natural." Women have been giving birth and nursing their children since time immemorial. I believe that breastfeeding is normal, a natural course of event, and is expected of mothers.

No one in the first and only breastfeeding support group I attended shared my thoughts. Even as I look back now, I realize that the breastfeeding moms who were there also do not view breastfeeding anywhere near "natural."

When I finally nursed Caitlin, I realize that my expectations have been misplaced. My belief that breastfeeding as a natural course of life for women is now in the remote past.

I learned that the practice has been lost to a lot of women and mothers today. I, myself, was not breastfed long enough for my mom to know what to expect when you are breastfeeding. So this is also why breastfeeding support groups are very important. Without them, it's too easy to fall into the trap of feeding your child formula thinking that you do not have enough breastmilk to give. Without them, it's too easy to give up at the first sign of nipple tenderness thinking that it will only get worse. Without them, it's too easy to give up breastfeeding all together because of the many interrupted sleeps thinking that you'll never sleep tight again with a baby suckling from you.  

There is a wealth of knowledge in books and internet about breastfeeding, but nothing will comfort you best than a loved one or a fellow breastfeeding mom.

If I wasn't nearly due, I would have attended the succeeding meetings and stayed longer to bond and learn more from the breastfeeding moms in attendance. It could have saved me the embarrasment of talking to complete strangers, as if I have no other family and friends to help me, about what I am doing wrong and how to correct my breastfeeding booboos. They could have told me how silly the word "natural" is to breastfeeding and explain why. I would have learned the proper latch, ways to prevent nipple injury and engorgement. Or, simply, tell me how my life would completely change and revolve around the time when my baby feeds from me.


Many thank yous


My determination and perseverance to continue breastfeeding Caitlin would have been nothing if it weren't for my husband Jay, a total stranger and now friend Cha Antinero, breastfeeding advocate Miann Reyes-Oblea, a college friend and mom-of-two Mara Evangelista, and my co-blogger Raquel Chua.

Thank you for all the virtual pats in the back and you-can-do-its. I share my one-year breastfeeding milestone with you, and I am sure that Caitlin is thanking you, too.

Breastfeeding: Day 366. (Because 2012 is a leap year).

- Mommy Smiley


Tutorial: party pompoms

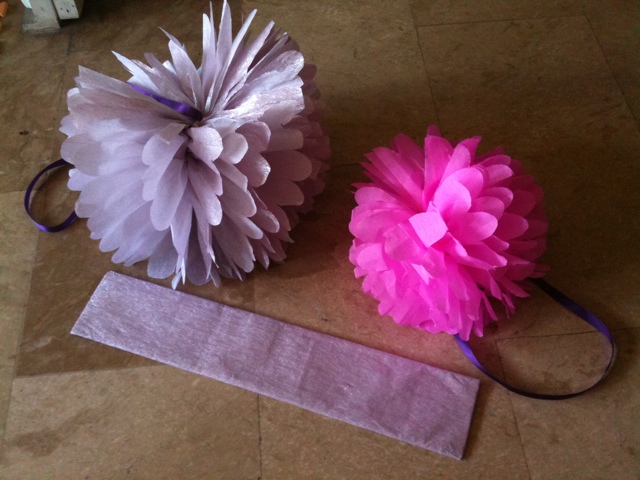
 Decorative party pompoms.

Decorative pompoms are an easy and fun way to glam up any themed party, and I just learned how to make them in time for Caitlin's birthday bash, thanks to my sister-in-law who's a natural DIY queen when it comes to event styling.


What you'll need:


Crepe paper in any color
Thin wire or floral stem (#26 or #30)
Matching strings or satin ribbons

 Prepare your materials. I bought all these at National Bookstore.

Directions:

 
Decide on how big or small you want your pompoms to be then cut your paper into rectangle pieces, the width will determine its diameter when opened.


For medium pompoms, making use of a full crepe paper, that's about 12 pieces of 10" x 12". You'll make a smaller one when you use 10 pieces of the same size.


For twice that size, cut 12 pieces of 11.7" x 15.5". The excess, which measures 4" x 4.3", may still be made into tiny pompoms.


Large and medium pompoms.

Place the rectangle pieces together and trim two opposite ends to make scallop edges. Although you can do it freestyle, it's best to work with a pattern, especially if you are making a lot of pompoms.

 Scallop edge.

Then, starting from one straight edge going to the other side, make a folded fan out of it, roughly half an inch in size.


Secure with a thin wire in the middle and place a ribbon.


Starting from one side, gently peel the crepe paper one by one as if opening a banana. Finish it off on the other side.


There you go.


You can also use Japanese paper, but I find crepe papers easier to handle because they are thicker so they don't tear easily. Crepe papers, the basic ones, are also less expensive than Japanese papers.

Happy crafting!

- Mommy Smiley


Caitlin turns 1, a poem


My dad composed a poem for the birthday girl who's sick on her big day. Get well soon, anak.

---

SMILIN' LITTLE CAITLIN
At twenty thousand feet enroute to Calgary
I pull a faithful companion from my hand carry
An iPad that conveniently stores
Photos of her who is so pure.

Browsing from page to page I see
Countless images of a smiling baby
Whose absolute beauty from head to toe
Is unequalled by the snow capped Rockies below.

From angelic poses on a chair
To one with a coiled towel on her hair
To proudly showing her two front teeth
Her charm will drive you to your death.
From yoga stance from bed to floor
To a drunken walk towards the door
To a grin that wrinkles her nose
Seeing them you will never ever doze.

From a perplexed stare at grass so green
To gazing at balloons flying to the beams
To wearing a new dress Mommy sewed
Forever to these photos you will be glued.

What more I ask if in person I see
Hug, kiss and cuddle this amazing baby?
My heart will leap I imagine it to be so
For my granddaughter is irresistible and true.

By: Bernie B. Julve
12 April 2012, South Western Canadian Skies

---

And here's a picture countdown of Caitlin Audrey's first 12 months.


0. Day 2 at the hospital.

1 month. Wearing the kimono I sewed her.

2 months. Smiling, happy baby.

3 months. Bringing her hands together for the first time.

4 months. Sitting on her own.

5 months. She found her feet.

6 months. Peek-a-boo.

 
7 months. Standing on her crib.

8 months. Happily eating her greens.

9 months. Rocking the froufrou onesie with matching headband that I sewed her.

 
10 months. Ears pierced.

 
11 months. Stroll in the park.

12 months. April 19, 2012. Sick with thrush. =(

- Mommy Smiley